Finding Errors
Debugging
Debugging is the process of finding and fixing errors in computer hardware and software.
Origin of the term bug - an aside
Errors in hardware and software are also called bugs. If you look at computer science textbooks or search on the web, you will most likely find that the origin of this term is attributed to U.S. Navy Rear Admiral Grace Hopper.

Dr. Hopper was a pioneer of computer programming. On September 9, 1947 a computer she was using was malfunctioning and when she went to investigate she found the cause to be a moth that got caught in a component. In the log book she wrote “First actual case of bug being found” and attached the moth with a piece of tape.
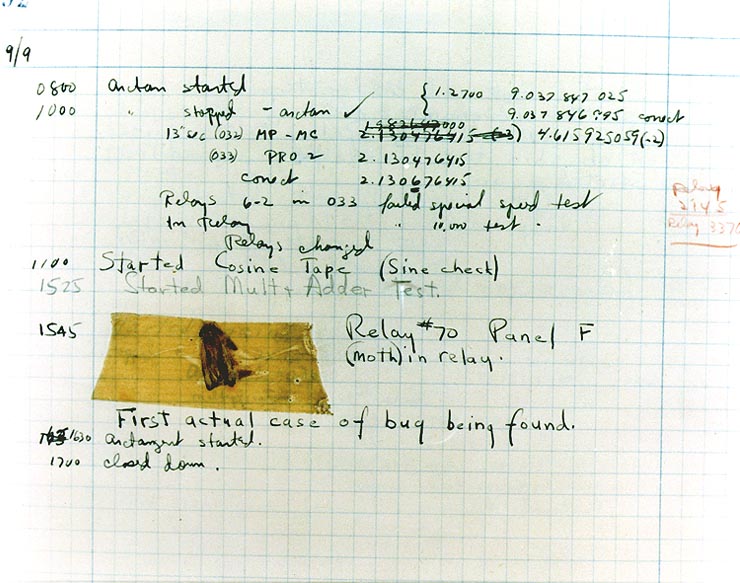
While this event is often cited as the first usage of the term bug, notice that Dr Hopper wouldn’t write “First actual case of bug being found” if the term wasn’t already common. In fact, Thomas Edison used the term bug to refer to an error as early as 1878 writing:
It has been just so in all of my inventions. The first step is intuition and comes with a burst, then difficulties arise—this thing gives out and [it is] then that “Bugs”—as such little faults and difficulties are called—show themselves and months of intense watching, study and labor are requisite before commercial success or failure is certainly reached.”
That erroneous attribution aside, Dr Hopper played an amazing role in computer science. She developed one of the first successful computer programming language and she was pivotal in developing the first general purpose large-scale computer, the UNIVAC I. Here she is at the console.

The UNIVAC I, ground-breaking in its day could process 1,905 operations per second. In contrast, our Arduino Uno can process 16 million operations per second.
How to find your bugs
You’ve wired a circuit involving buttons and LEDs, wrote and uploaded the software, and it doesn’t work. Where is the error? Did you wire something incorrectly? Do you have a simple error in your code or is the error in your general approach? Unfortunately, the Arduino doesn’t offer much debugging support.
By now you have encountered a number of bugs in your projects and you’ve developed your own methods for debugging. Here I hope just to offer a few more methods and tools you can use.
Syntactic bugs
When writing a paper we often have typos and, at times, syntactic errors.
Here I’ve written a simple blink an LED program loaded with errors:
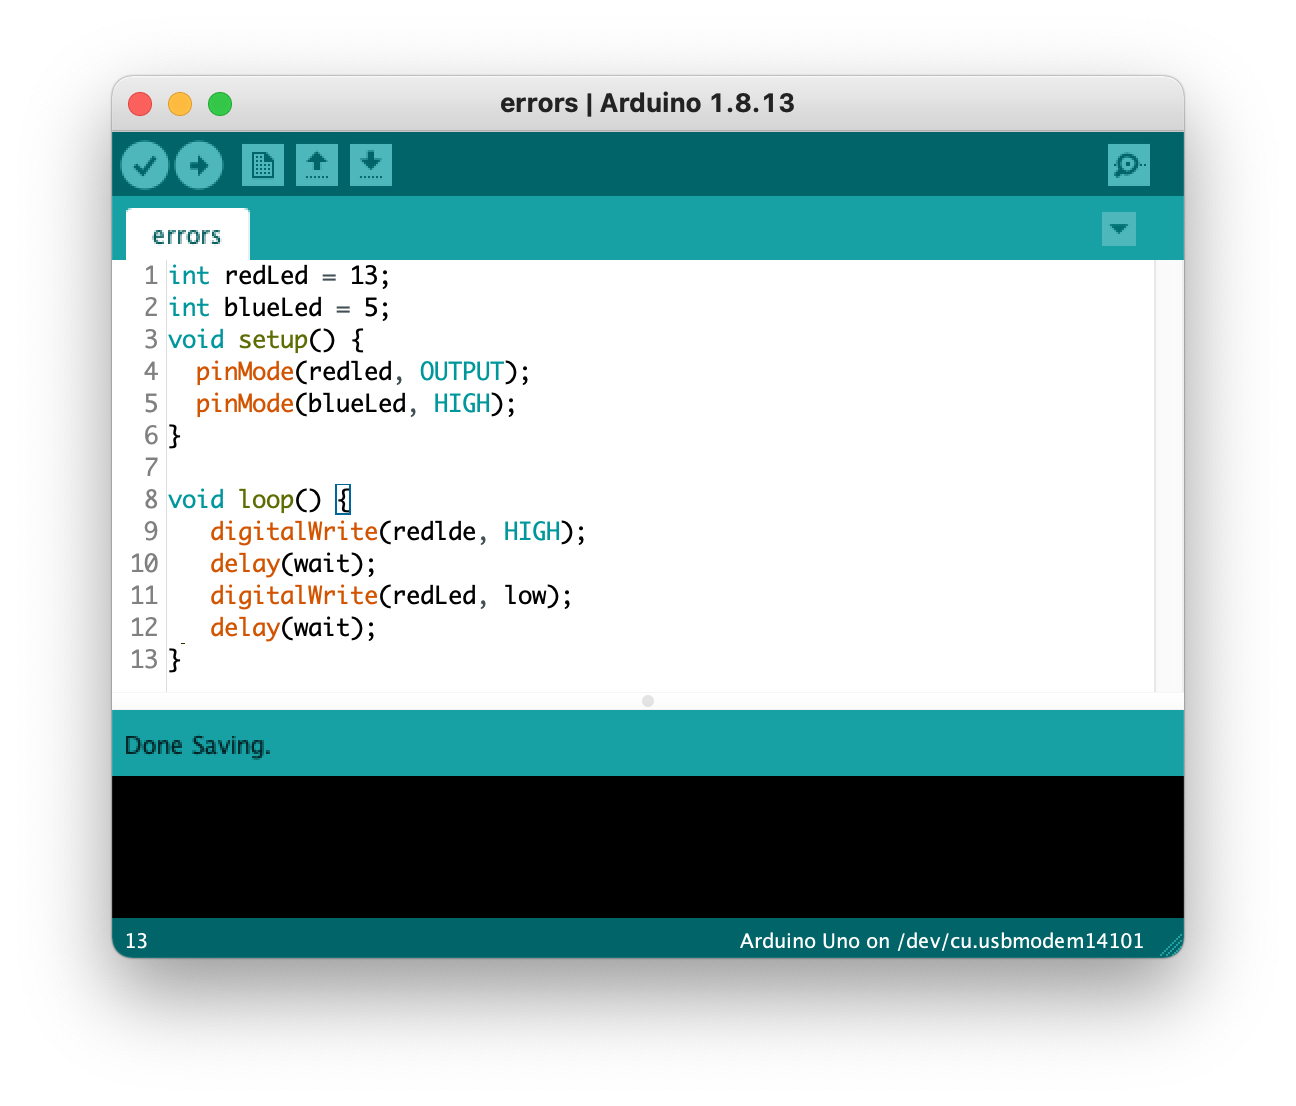
When I check the syntax of the program by clicking on the checkmark icon …

I get an error message displayed.
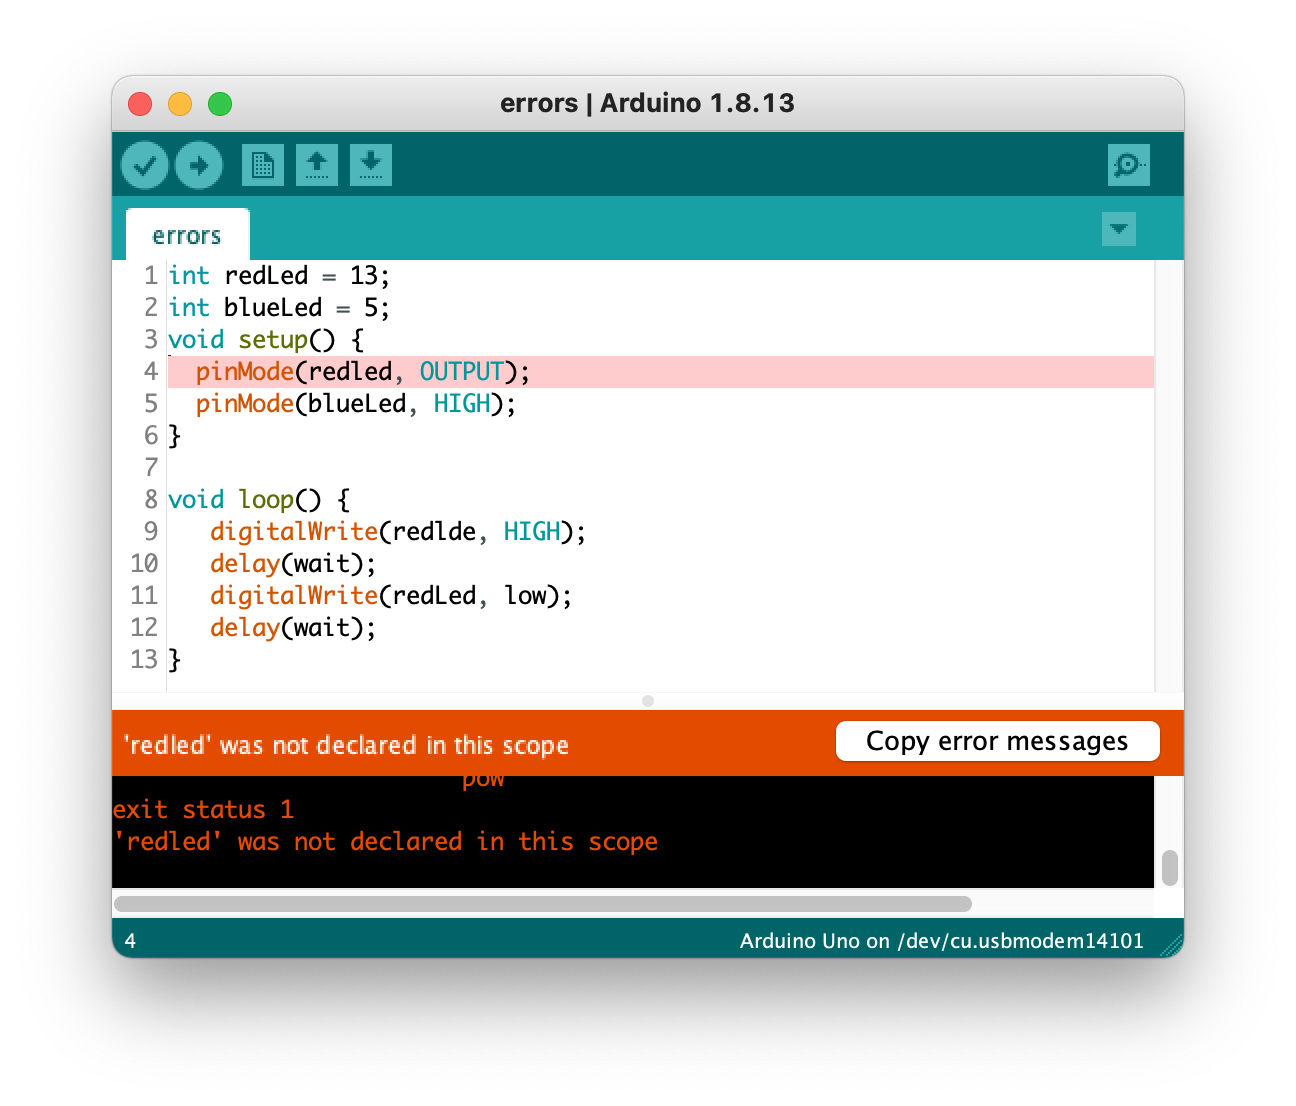
It says ‘redled’ was not declared in this scope and sure enough, when I declared the variable in line 1 it was redLed with a capital L, but on line 4 it was with a lowercase L —redled.
That error pane can be expanded by dragging the upper edge upward. In the expanded view we can see all our errors.
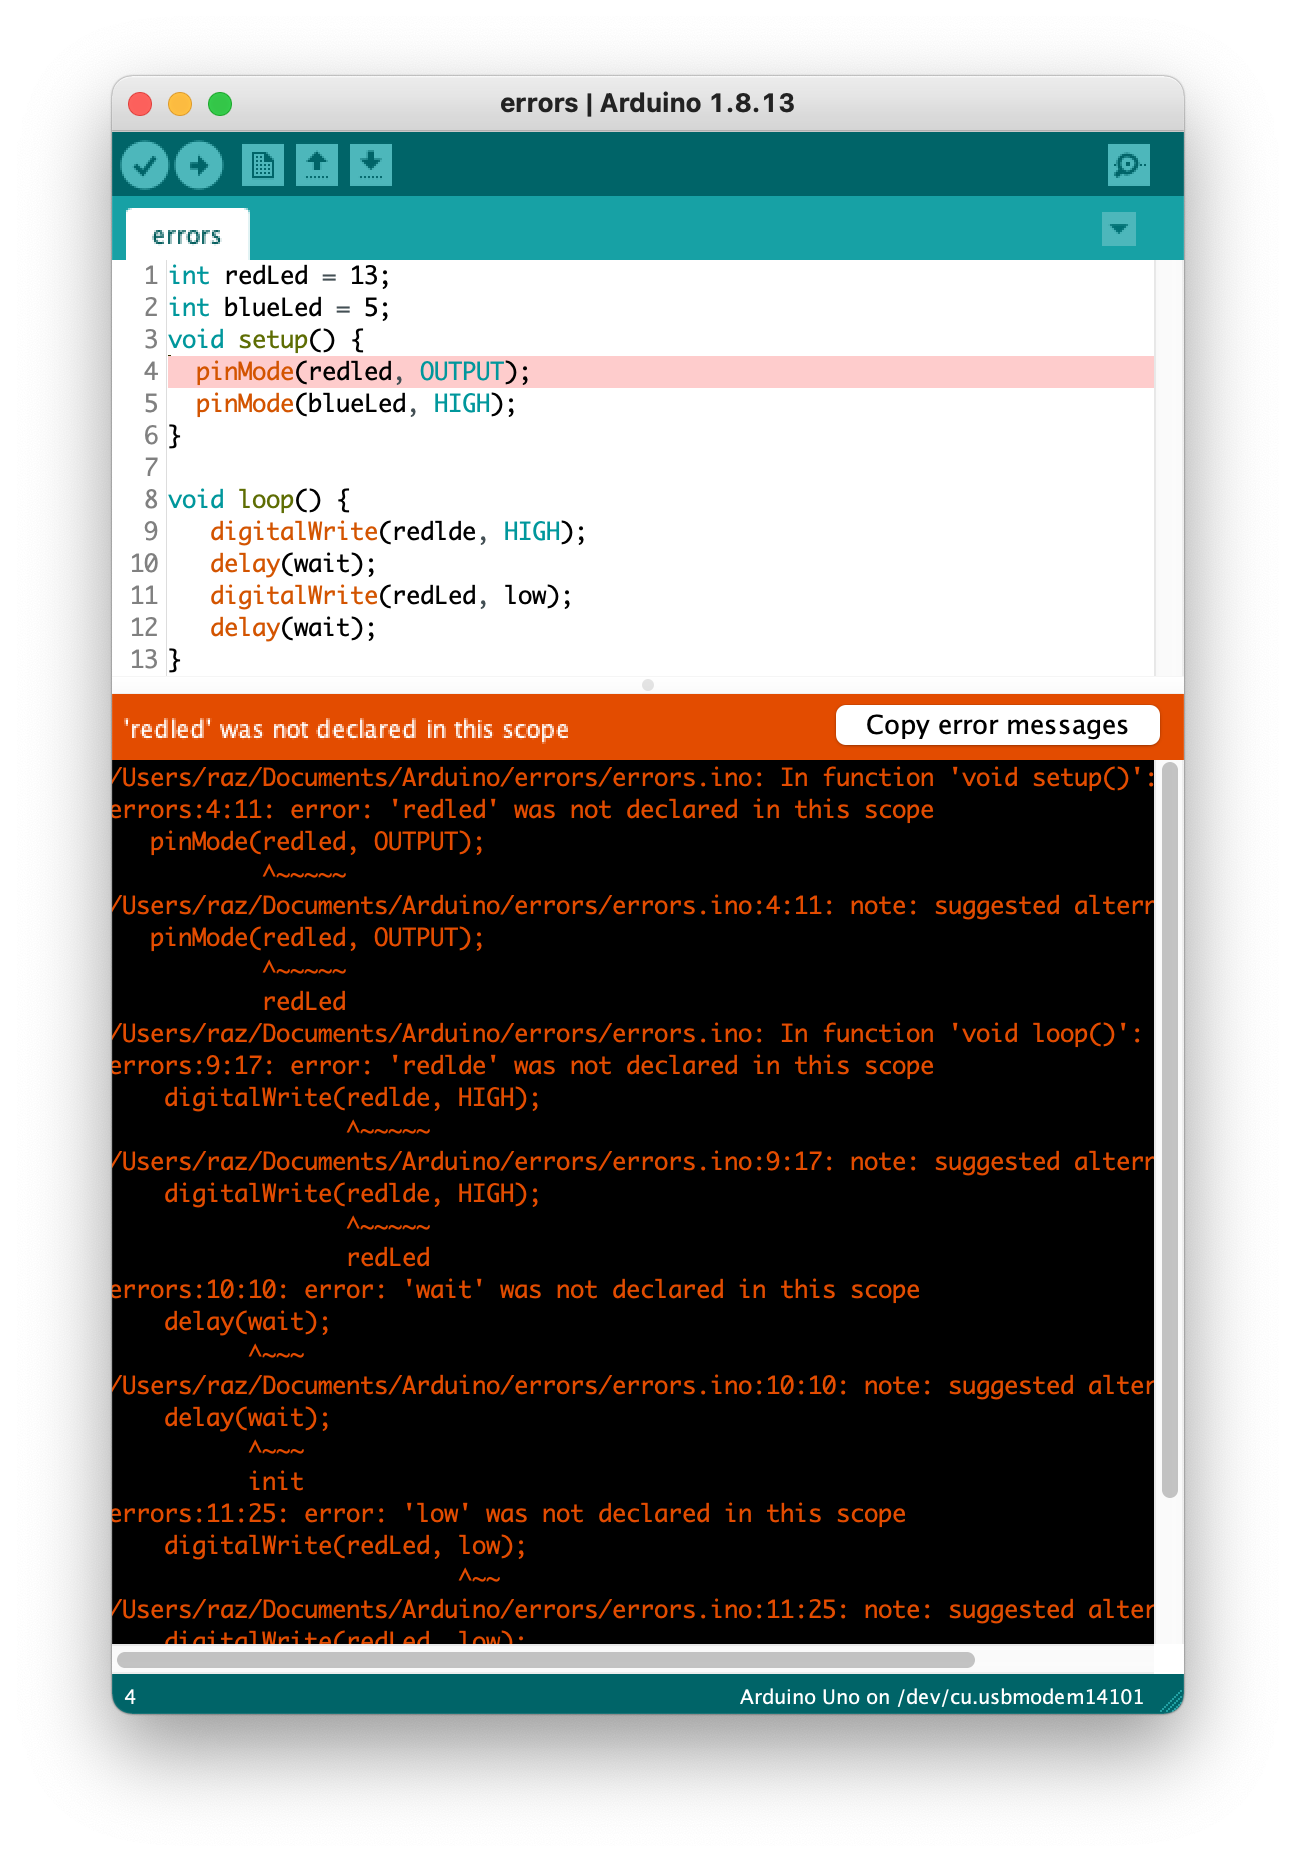
The next error is
errors:9:17: error: 'redlde' was not declared in this scope
the 9 after the word errors refers to the line number of the error. On line 9 we can see that I have a typo.
As you can see it is useful to expand the error pane.
The code uploads fine but doesn’t work as expected.
Syntactic errors are the most common but also are the easiest to fix. If your code uploads fine but doesn’t work as expected you’ll need to determine whether it is a hardware or software problem. Errors are inevitable and you have a choice. You can either
- view the errors as frustrating roadblocks that are near impossible to fix.
- or view them as an interesting, fun, puzzle to solve and think “I can do this”
If you spent hours trying to figure out your bug and are just getting more and more frustrated, have someone else look at your circuit and code with fresh eyes.
When the circuit contains multiple components: buttons and LEDs, a light sensor and a buzzer, it is useful to determine which component and its associated code has the error. This is where the serial monitor comes in.
The serial monitor
The serial monitor has multiple uses outside of debugging but we will focus on its use as a debugging tool.
When we are programming the Arduino Uno we have a cable connecting our laptop to the Uno. That cable allows us to send the code we wrote on our laptop to the Arduino and supplies power to the Arduino. It can also be used to communicate between your laptop and the Arduino. Your laptop and the Arduino can send messages back and forth. This connection is called a serial connection, serial meaning sending one bit of information after another. If we want to send the word hello from the Arduino to our laptop, it first sends the h followed by the e, followed by the l and so on. Serially. In order to do this, one thing the laptop and the Arduino need to agree on is how fast to send the letters and this is called baud rate meaning how many bits per second are we sending. In the Arduino code we set the baud rate with.
Serial.begin(9600);
Here we set the baud rate to be 9,600 bits per second, which amazingly enough, is on the very slow side. If we want to send information to our laptop we use:
int msg = 143;
Serial.println("hello");
Serial.println(msg);
println stands for print line. On our laptop this will print:
hello
143
As you can see println prints each item on its own line.
Here is a simple program:
void setup(){
  Serial.begin(9600);
}

void loop(){
  Serial.println("Hello");
  delay(1000);
  Serial.println("World);
  delay(1000):
}
After we upload the code it will be running on the Arduino.
Now we want to see the messages on our laptop. To do that we will open a serial monitor window. As the name suggests, the code will monitor the serial connection and print the messages to the window. We open the window in our Arduino editor by clicking on the magnifying glass icon in the upper right:

It will open up a window showing the messages the Arduino sent:
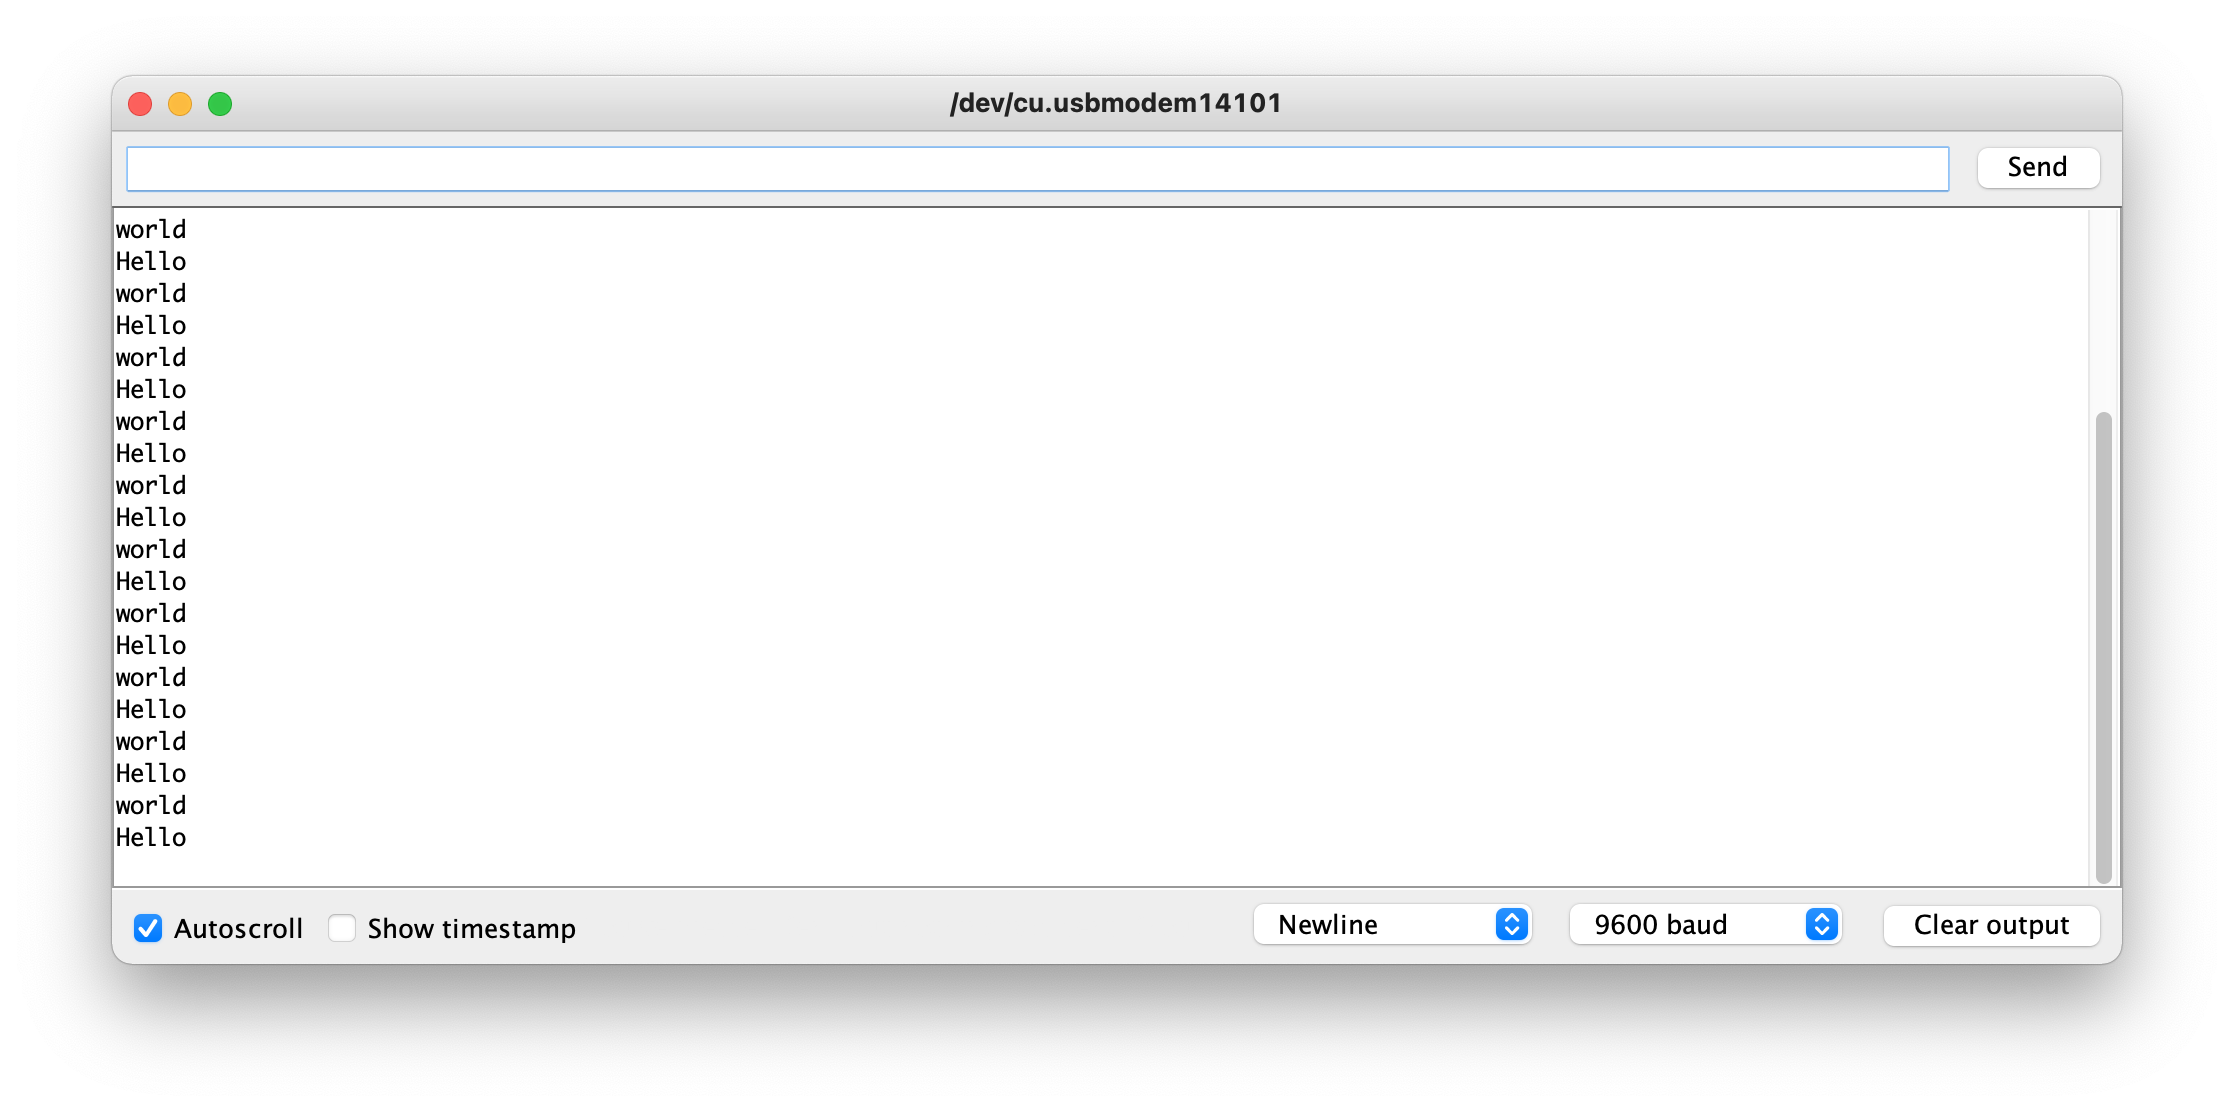
By default, the window should be set to 9600 baud as shown in the lower right of the window. If it is not, you can select 9600.
This is all fine but what does it have to do with debugging? Let’s look at a simple example,
Let’s go back to our button code where if we press a button an LED light goes on:
    int led = 13;
    int pushButton = 3;

    void setup() {
      pinMode(led, OUTPUT);
      pinMode(pushButton, INPUT_PULLUP);
    }

    void loop() {

        // if button is pressed
        if (digitalRead(pushButton) == LOW){
            // turn on the LED
            digitalWrite(led, HIGH);
        } else {
            // else
            // turn off the led
            digitalWrite(led, LOW);
        }
    }
We upload the code and it doesn’t work. Is the button side of things incorrect or is it a problem with the LED? We can add Serial.println to help isolate the error.
    int led = 13;
    int pushButton = 3;

    void setup() {
      pinMode(led, OUTPUT);
      pinMode(pushButton, INPUT_PULLUP);
      Serial.begin(9600);
    }

    void loop() {

        // if button is pressed
        if (digitalRead(pushButton) == LOW){
            // turn on the LED
            Serial.println("Button Pressed);
            digitalWrite(led, HIGH);
        } else {
            // else
            // turn off the led
            Serial.println("Buton Not Pressed);
            digitalWrite(led, LOW);
        }
    }
Now when we press the button and see Button Pressed in the serial monitor, we know the button works correctly and there is a problem on the LED side of things. On the other hand if we see Button Not Pressed when we press the button, we know there is a problem with the button.
This is a very simple example, but as we develop more complex circuits and code with a lot of
if ...
...
else if ...
...
else if ...
...
else if ...
...
else ...
...
This Serial.println method becomes more useful. We will see this in the next experiment using potentiometers.